Having a drink with your mates on Hellominers is fun!
Alcoholic drinks have been on Hellominers for years but not everyone knows how to brew them.
That’s why I created this visual guide to help you get started with your brewing empire!
We use the Minecraft brewery plugin and this guide along with some basic recipes we’ll help you get started.
There are many drinks that you can brew on Hellominers, all the basics can be found in this Basic Recipe Guide over here.
But before you get to brewing, you need to know how to brew!
So lets start with the very basics.
In order to start a brewery you need the following items:
– cauldron
– brewing stand with glowstone dust in the top slot.
– wood to create a barrel (not the vanilla one)
– a fire source like a campfire or netherrack lit on fire.
– empty bottles to put your brews in!
– a sealer to help you sell drinks easily
The Cauldron
While not all drinks need a barrel or even a brewing stand. In order to make any drink at all, you are going to need a cauldron with a fire under it.
Now there are two ways to have a fire under your cauldron.
- Use a campfire under your cauldron.
- Use netherrack and light it on fire with flint and steel under your cauldron.
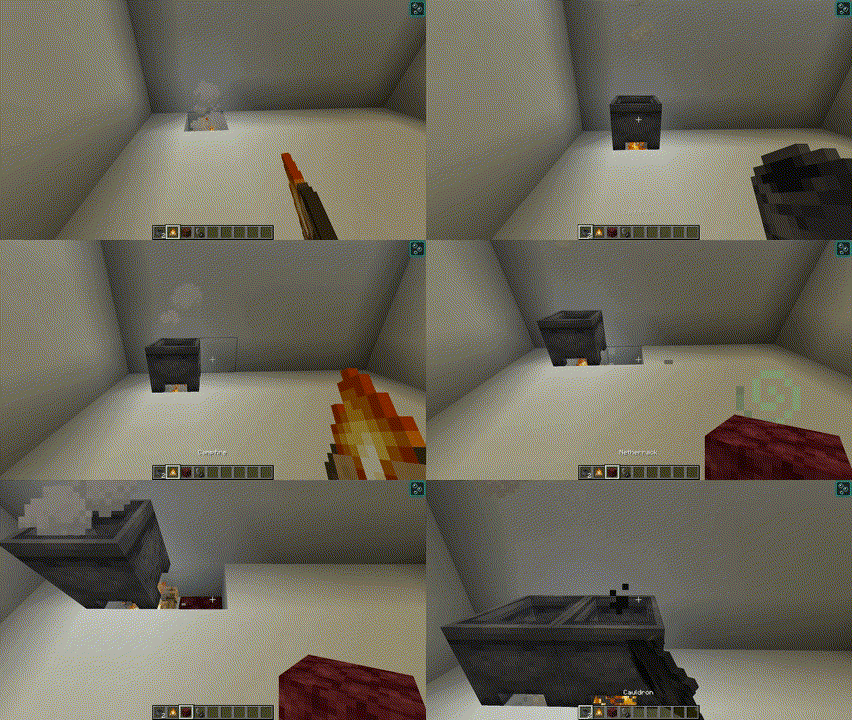
Now that you have your cauldron placed, it’s time to fill it up with water!
You do this by taking a bucket, filling it water and emptying it in the cauldron like you normally would.
You’re now ready to brew! So lets start with a very simple recipe from the Basic Brewing Recipes.
How to use the Cauldron to brew.
Before you start brewing, it is smart to pick a recipe and stick to it.
For this example brew we will be brewing a Strong coffee
A strong coffee is a simple recipe that you make with 12 cocoa beans and 2 buckets of milk. It takes 2 minutes of cooking so make sure you have a timer on your phone or a separate tab.
Start your timer and as fast as you can right-click the ingredients into the cauldron. Like in the GIF here:
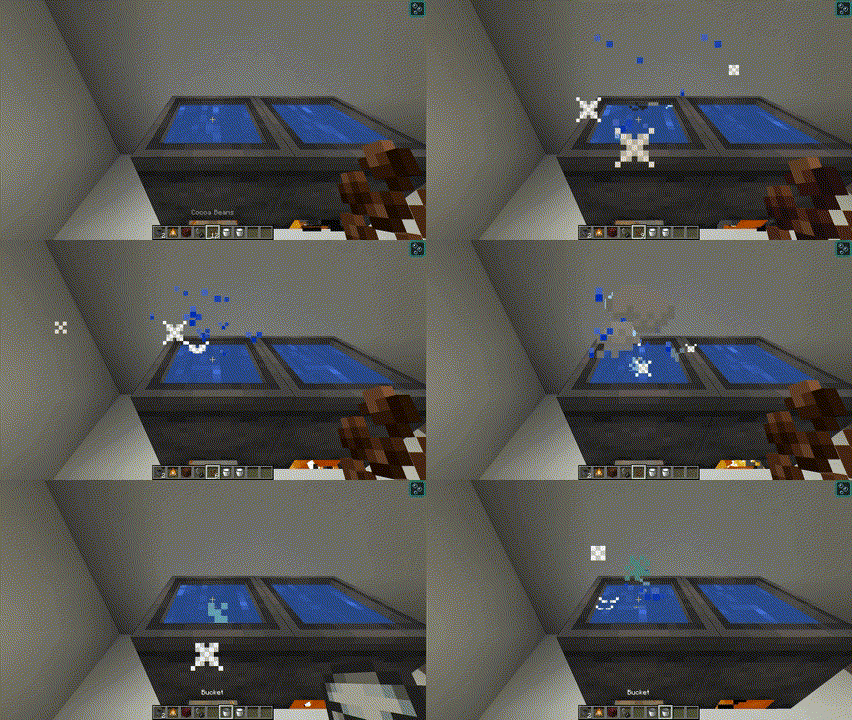
Now wait for your 2 minute timer to let you know 2 minutes have passed and get some bottles ready to start bottling up. 2 minutes passed?
Now right-click the cauldron with your glass bottles 3 times.
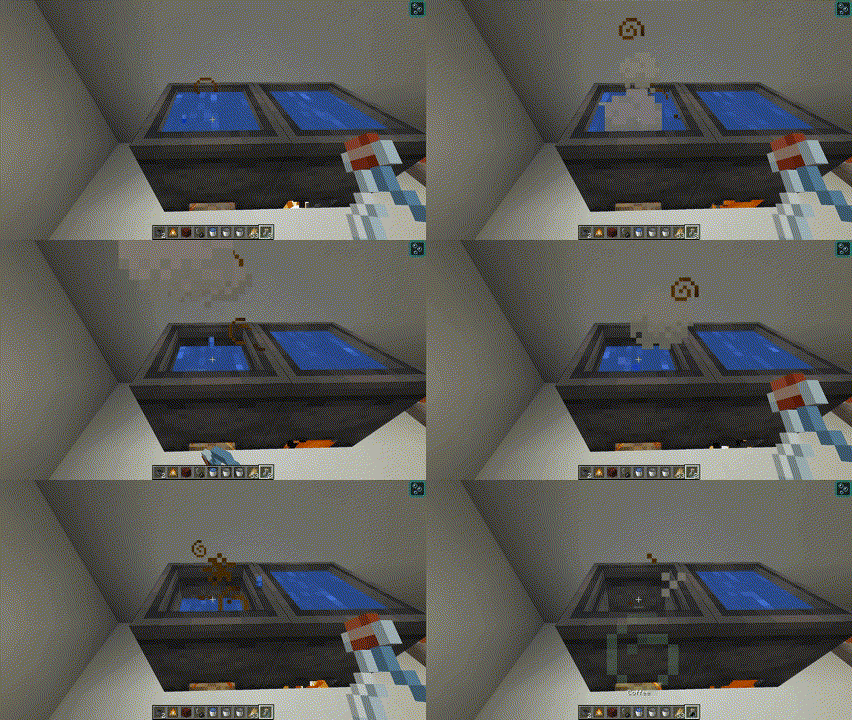
Congratulations, you just brew 3 strong coffees! If the coffee was made perfectly it will show 5 stars, this happens when you cook it for the right amount of time and use the right amount of ingredients.
If something goes wrong, you’ll get anywhere from a 4-star drink to a 1-star drink, you can still drink those but their effects will be less good. An example of a well made strong coffee is pictured here:
How to use the Brewing Stand to distill your drinks.
Lets say you’re over coffees and want to brew something stronger like Russian Vodka.
Well, you put in the ingredients and let it cook, according to the recipe, just like you learned how to do in the previous step. For Russian Vodka we use 10 potatoes and let them cook for 15 minutes.
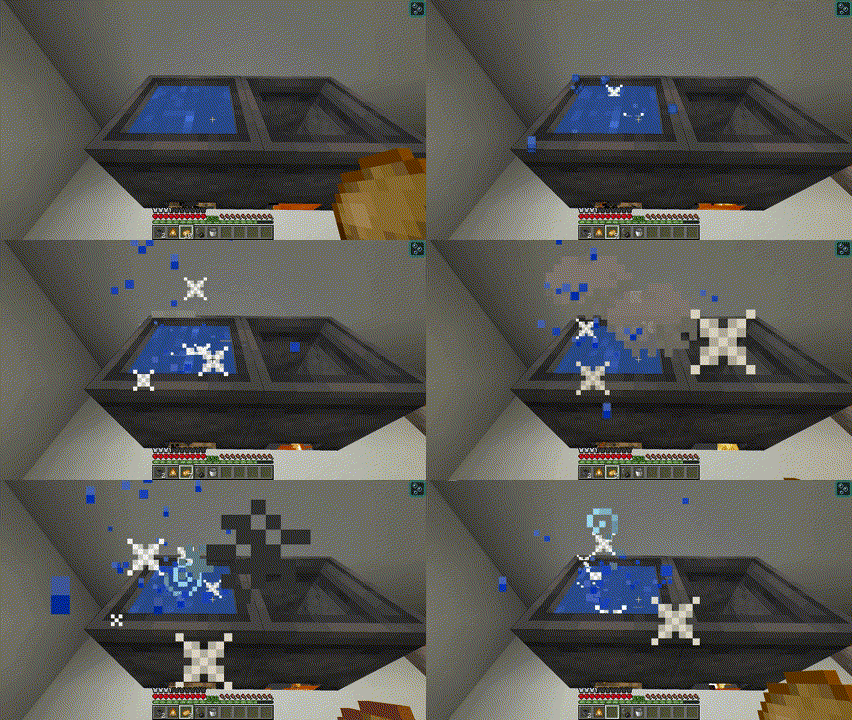
Now the 15 minutes are over and you grab your glass bottles to bottle up your vodka… but what’s this? potato mash? that’s not vodka at all!

No worries, you followed the recipe exactly as you were supposed to do. In order to turn this potato mash into the Russian Vodka you want so badly, you use the brewing stand to distill the drink!
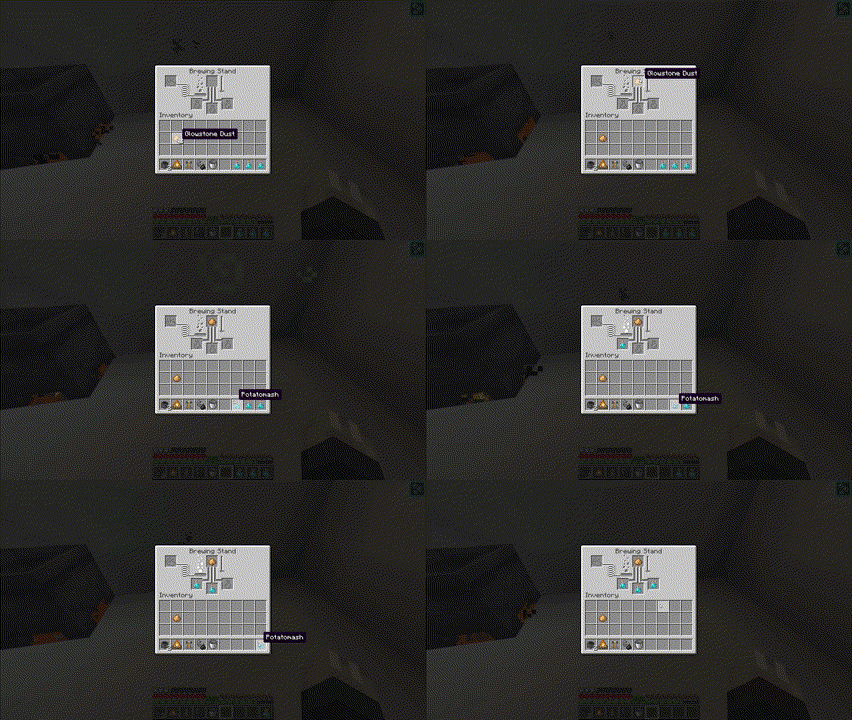
Put in a glowstone dust in the top slot, don’t worry that glowstone dust won’t ever be consumed.
And put your potato mash in the bottom slots.
Now we wait while the brewingstand does its job. This can take up to a minute to distil for this particular recipe.
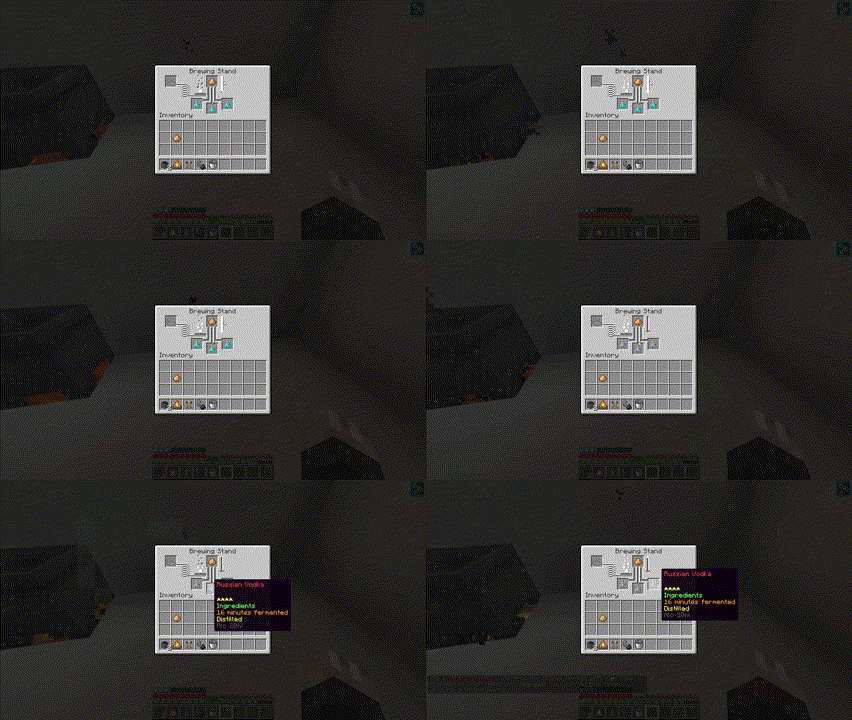
As you can see the blue potato mash turns into grey Russian Vodka!
If you hover with your mouse over the bottle it will tell you whether you made the drink right or wrong.
In this case, it is made with the right ingredients but it’s also overcooked by a minute, making it a 4-star drink instead of a 5-star drink.
But let’s imagine it was a 5-star drink instead, according to the recipe we have to distil it 3 times for the drink to become perfect.
Here you see a 5-star vodka and a 4-star vodka. The 5-star vodka has been distilled 3 times (even though the item lore doesn’t say that) and sealed, which is something we’ll cover later in this guide.
The 4-star vodka has also been distilled 3 times but due to being overcooked it will contain less alcohol and have a lesser effect when you drink it.
How to make and use barrels to age your drinks.
This next part concerns drinks that need to age. Some drinks need very long aging processes which can be rather boring. So if you want to skip to learning how to seal and sell your drinks skip to Sealing Drinks by clicking here.
If you’re not discouraged and want to create aged drinks like Golden Rum or Beer, read along!
When aging drinks, it is important to know what kind of barrel to use. Yes, there are multiple barrels when you’re brewing and no worries, I’ll explain how to make those barrels.
For a brewery barrel we need the following items:
20 planks, 16 stairs, 5 fences and 1 sign.
When picking a recipe, be sure to carefully check what wood your barrel needs to be made off.
Barrels can be made of the following planks: Birch, Oak, Jungle, Spruce, Acacia and Dark Oak.
You make all barrels in the same manner, you just use different types of plank.
As an example, we’ll make golden rum, which needs to age in an oak barrel, which is the most common barrel to age drinks in. Check the gif to see how I build a barrel.
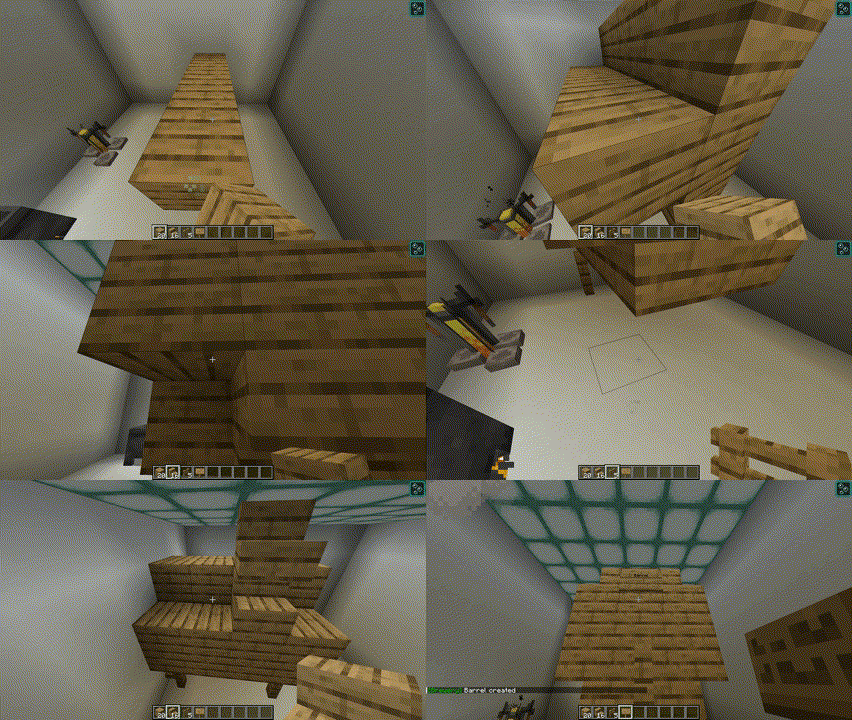
Now we have our barrel ready, let’s have a try at ageing our rum!
In the chapters before I’ve already explained how you can cook and distill drinks. So I’ll spare you the gifs of brewing that as well.
If you followed the recipe (cook 14 sugarcane for 15 minutes) you should be bottling up sugar brew. Distill it twice and you’ll have Spicy Rum. We’ll put this spicy rum in the barrel for it to age 14 years.
Now when a recipe tells you something needs to age for a certain amount of years. You need to see a year as a minecraft day, so basically 20 minutes.
In the case of golden rum we’ll have to age it 14 times 20 minutes.
Now we click on the barrel we just created (anywhere on it really) and put in the drinks, wait 14 minecraft days and you’ll have perfectly aged golden rum.
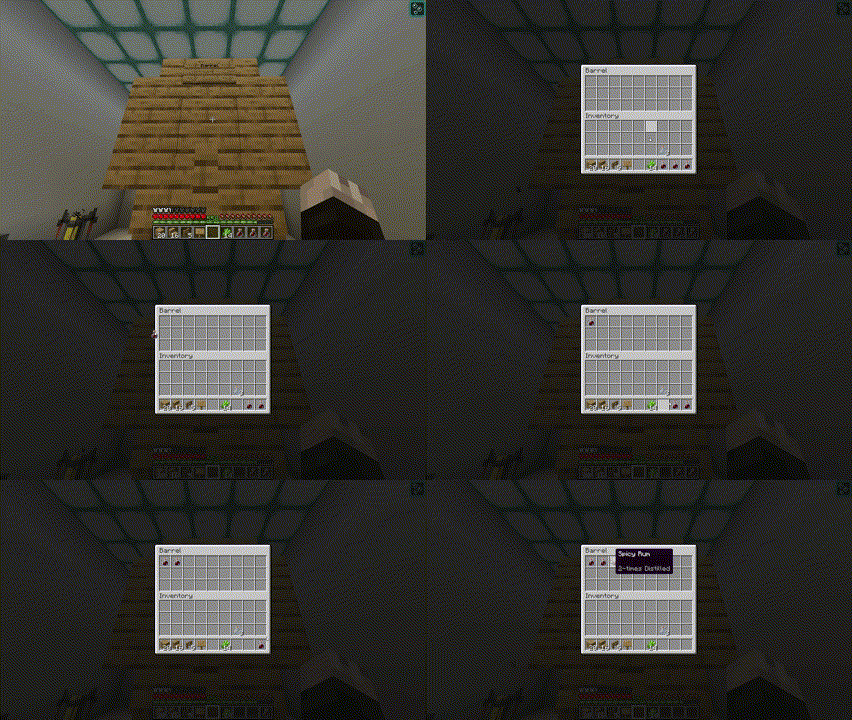
If you let it age shorter, the amount of alcohol and the quality will be lower, same goes for letting it age too long. So make sure to set a timer and check now and then.
After having your drink in the barrel for like 10 minutes it will start showing lore and how long it has already been aging.
This is useful when you’re making drinks like Sweet Rosé Wine which doesn’t need distilling but does need ageing.
Now let’s check in on our golden rum, as you can see the lore tells you that we used the right ingredients, the right amount of it, cooked and distilled it well and that we put it in the right woodtype!
Only a couple more ‘years’ to go and this drink will be perfect!
Keep in mind though, once your drink is aged, do not put it in a vanilla minecraft barrel, as it will continue to age and ruin your drink.
That covers ageing drinks. Which brings us to the last part: Sealing and selling your drinks!
Sealing and Selling your Drinks
So you’ve made your drinks and now you want to sell them! But when you try to sell them in your chestshop you come to the frustrating realisation that not all your drinks have the same item code, making it hard to sell like a chest full.
Well, that’s where the brew sealing table comes to play!
You make one by using 4 wooden planks and 2 glass bottles in a normal crafting table.

Once you have your Brew sealing table ready, place it and put in your drinks. The brewing table will now spit out your drinks, all having the same itemcode.
That is ofcourse only if the drinks aree the same drink and of the same quality.
So putting a strong coffee and a golden rum in there and expecting it to come out with the same item code is not going to work. Same goes for a 5-star strong coffee and a 4-star strong coffee.
You can check whether your drinks have the same item code by using the command /iteminfo while holding your drink.
If one of the drinks hasn’t changed its item-code to be in sync with the other, just put them all in again until it gets it right.
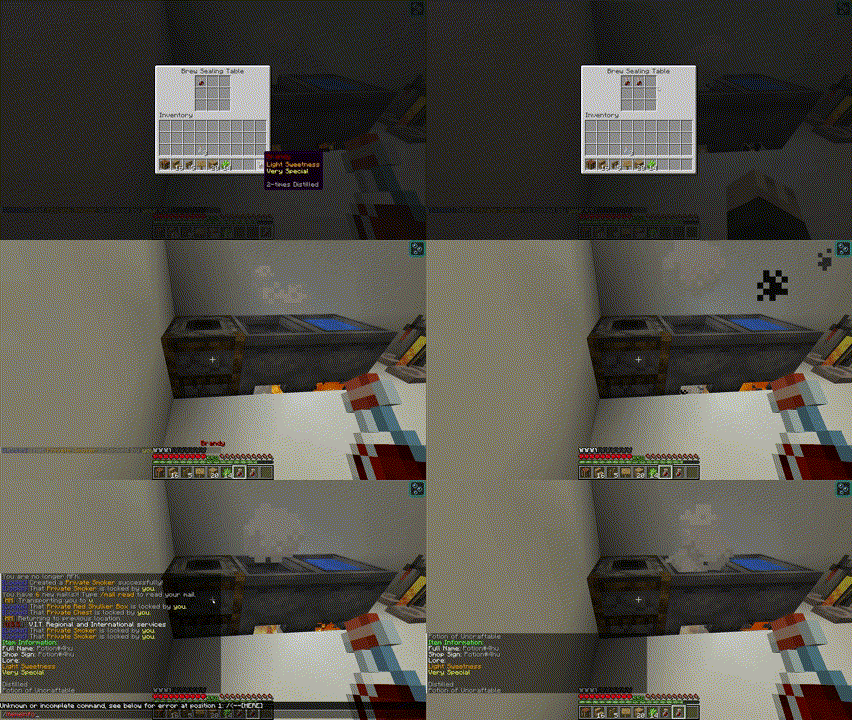
Now to sell your perfect drinks, put them into a chest (not a vanilla barrel) and place a sign on it.
Write on the sign the following:
First line: username
Second line: Amount of drinks you want to sell
Third line: Price
Fourth line: Leave a question mark: ? if you have the drinks in your chest already the game will find the itemcode for you.
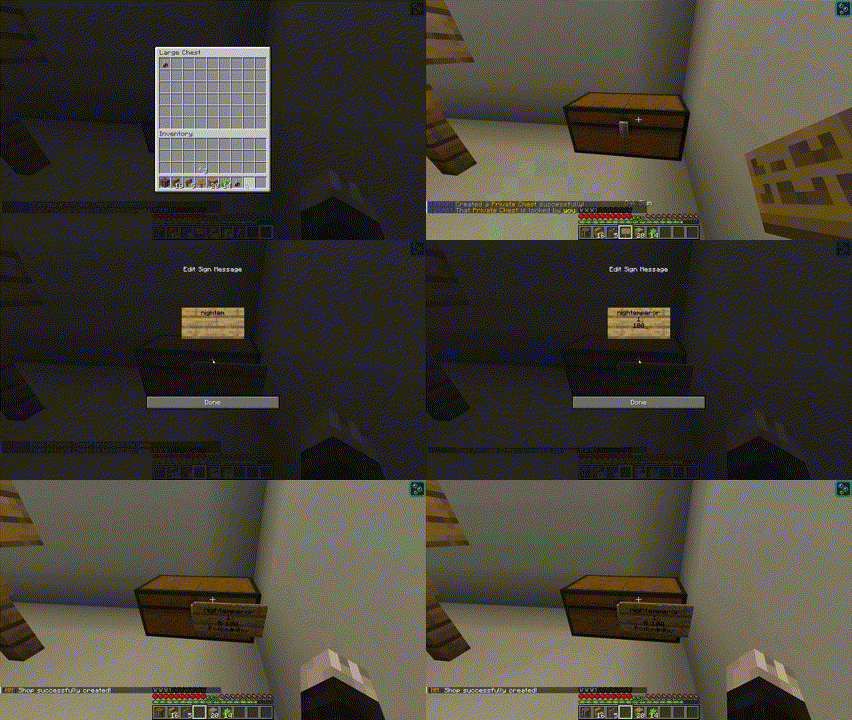
That’s all there really is when it comes to brewing! Oh and don’t forget to share your drinks with your friends 😉
On this site we have the recipes for basic public drinks. However, there are also some ‘secret’ public drinks that you can make by experimenting or maybe asking a player if they’re willing to share some secret public recipes with you 😉
Click here to see the list of all public, secret public and private drinks.
Private drinks are exclusive recipes made up by players for themselves. Lets say you want to have your own company drink, you can have staff make one. To learn more about that, check out this article about setting up your own brewery and making your own private drinks!

